Is fully automatic bond testing possible?
Advances in bond testing have progressively improved accuracy and reduced operator input but can the process be truly automated? We examine what is possible with a modern bond testing system.
Introduction
In its infancy bond testing was wire pull, followed by die and ball shear. It evolved to satisfy the ever increasing diverse range of semiconductor and electronic applications. This requirement continued to evolve requiring ever more advanced test methods to keep pace with new technology. This became the first priority and kept bond tester designers busy. If bond testing needed to test all the bonds being made, full automation would have been developed from the very beginning. But as only a relatively small number of bonds required testing, the development and capital cost equations of bond testing differed from that of production machines. Attempts were made to add automation but most cases lacked the resources and ultimate commitment from both equipment suppliers and end users to provide what the industry might expect. Being involved from the beginning, always wanting to achieve full automation and born of experience rather than capital investment, a few very experienced bond tester designers started to see how it might be achieved.
There was never any doubt about the benefits of automation. Apart from the obvious saving in operating costs it should be faster, but perhaps most importantly it could test more consistently and accurately. The only justification for bond testing at all is to measure the quality of your bonds and in so doing maintain and improve, production yield and product reliability. This being the only reason for a bond tester’s existence should make accuracy the highest priority for any bond tester designer.
What is required for automation?
Applications with only one type of bond that can be tested with one type of test sensor and tool can perform automation with a single head system. When more than one bond type is to be tested a multiple head system is required. Even applications for one test type can benefit from a multi-head system since spare tools can be fitted to a spare sensor enabling immediate recovery from a worn or damaged tool situation.
A fundamental requirement for bond testing automation is repeatable and accurate alignment of the test tool to the bond. To achieve this the tool must be positioned in three axes and a rotation relative to the samples bonds with the required accuracy. The accuracy depends on the sample but a bond tester should be designed for the most challenging of these.
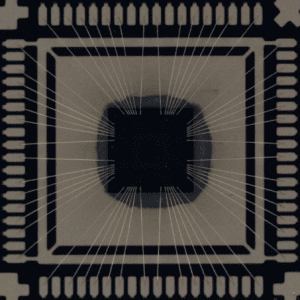
A bond tester’s test method is actually a partial automation. It automatically applies the load to the sample with the selected sensor and tool in a prescribed manner. The details and design of test methods are explained in our “The Science of Bond Testing ©” modules. What is generally known as automation refers to the automatic alignment of the test tool to the sample before the application of a test method. This might seem simple but alignment is one of the 4 principle Test Parameters required for accurate and optimum bond testing (again explained in our Science of Bond Testing modules).
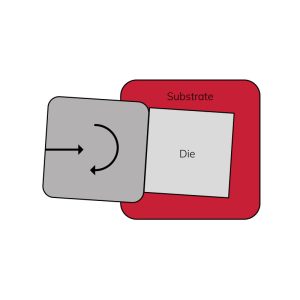
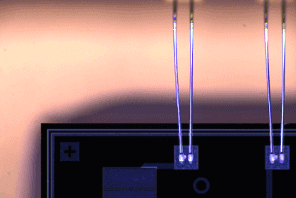
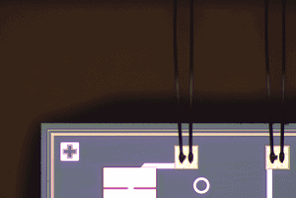
Alignment of the test tool should, therefore, be applied to the bond with the required accuracy. In fine pitch applications high accuracy is required. In all bond testing the positional errors of the bonder must also be accounted for. Examples of this are the variation in wire position in wire pull (Fig 2) and die rotation in die shear; the bonder only has to account for things like variation in pad position, a bond tester has to account for the variations in the pad and the bond made on to the pad (Fig 3). In addition other features that might be an ideal reference (fiducial mark) for the bonder can be obscured once bonds are made and not available for the bond tester. An operator can easily make adjustments from a complex bonded image where machine vision may not.
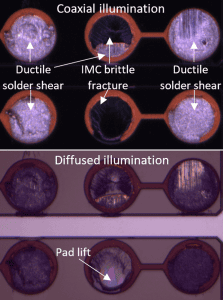
For ball shear, the bond positions vary on the pads and wires at different angles can complicate image analysis (Fig 3).
A common perception is that a bond tester measures a bond’s strength as a force. While this is mostly the case, it is only part of what it should provide. Also, it does not apply to None Destruct Testing (NDT), something we refer to later. The bond “force” is typically the peak or maximum force recorded but the real force metric from a bond tester is the Force Vs Displacement data/graph which provides the peak force and much more including, energy and stiffness.
It should be understood thought that more important than anything, even force, a bond test produces a failure mode.
The Science of Bond Testing, Golden Rule Number 1 teaches us that we should “Choose the test type and settings that gives the most failure modes of interest”. It follows on with, “If the bond test produces the same failure mode as the true load, the bond test measurement will be very meaningful. If the failure mode is different it will have less meaning or possible no meaning at all”.
The message is that everything starts with the failure mode, there is less or no value in testing the “wrong thing”. When we think about applying automation, the failure mode should be well understood but it always remains the most important measurement. In an appropriately set up bond test, there is normally a relatively small number of failure modes that will occur, selecting from these after each test is known as “Grading”. A bond tester is extremely good at measuring Force Vs Displacement, it is typically much less capable at grading the failure mode. Again we traditionally rely on the operator to make a more accurate decision.
As an operator is traditionally required for accurate test tool to bond alignment and failure mode grading, they can also load and unload the sample. As in the case of wafer testing, manual load and unload of the sample can have unacceptable risk. The wafer may be contaminated or damaged in the process. This step is often automated but it is not always accomplished for the purpose of full automation.
As most bond tests produce some test debris this also has to be considered.
The additional requirements for full automation required from a conventional bond tester are then,
- Multiple test heads
- Accurate tool positioning
- Automatic load and unload
- Measurement of gross sample position (fiducial camera alignment)
- Accurate automatic alignment for variations in bond position
- Automatic failure mode analysis
- Test debris management
What is possible with modern automation
Looking at each of the previously mentioned requirements for full automation in turn.
Multiple test heads
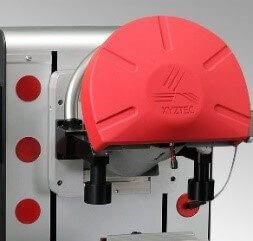
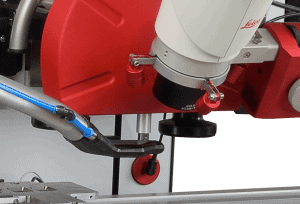
A bond tester with 6 automatically selectable test heads is sufficient for the vast majority of applications (Fig 4). When this is not sufficient, a quick-release multiple test head can be a solution (Fig 5).
Accurate tool positioning
A tool to sample positional accuracy of ±10µm is adequate for most bond test applications. This can be achieved on bond testers with precision axis that have backlash free drives and mapped linear positional encoders. Better accuracies in the region of ±5µm can be achieved with local fiducial alignment. Systems with rotary encoders (fitted to the drive motors) will have an accuracy of no better than ±50µm which is very often insufficient. Tool rotation accuracy should be ±1° or better.
In wire pull, to ensure only one (and the correct wire is tested), good hook concentricity is essential. A hook concentricity of 10µm being sufficient for most applications. Hook concentricity enables the extremely useful “Auto-hook” where the hook is automatically rotated by 90° during a test. It can be noted that a concentricity of 10µm results in a maximum 5µm positional error as a result of the 90° rotation. This degree of concentricity can only be achieved by adjusting the hook when it is mounted on the sensor shaft.
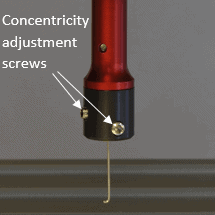
Hooks are typically delicate and even the slightest collision will affect/destroy a good concentricity. If the hook concentricity can be easily adjusted they can be reset in most cases. A modern bond tester will have such mechanical adjustment (Fig 6) but also software correction (Fig 7). With the two systems, combined hook concentricity’s in the region of 5µm can be achieved. Systems that rely on interchangeable and preset concentricity can achieve at best 25µm and in the event of a collision have no means of being reset.
Automatic load and unload
Machine vision
The last three of the requirements for full automation,
- Measurement of gross sample position (Fiducial camera alignment)
- Accurate automatic alignment for variations in bond position
- Automatic failure mode analysis
are solved by a machine vision approach. They all require high resolution imaging of the sample with flexible illumination to assist a robust image analysis. Before we discuss each of the requirements in detail it helps to set out what is possible from state of the art machine vision.
Deep Access
An important issue that affects all bond testing vision requirements is that known as “Deep Access”. In many applications there are parts of the sample above the bond to be tested that obstruct access for both the test tool, camera optics and illumination (Fig10).
In a lot of bond testing, the bonds and associated features are small. These small features require microscopic imaging methods with a resolution in the order of 1µm. The deep access issue requires that imaging systems are a significant distance above the sample. The distance between the imaging optics and its target is known as the working distance. Some deep access requirements can be up to 45mm. Achieving a 1µm resolution with a working distance of 45mm is possible, but due to the laws of physics alone, the image quality can never compete with a small working distance microscope.
Illumination
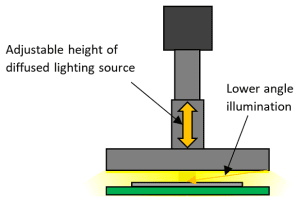
In addition to the camera optics, illumination plays an extremely important role in image analysis. In fact, camera optics typically set the image field of view and resolution that define useful magnification. The illumination affects contrast which is a very significant factor in image analysis. Two basic forms of illumination are possible with bond testing, Diffused and Coaxial, known as Bright Field and Dark Field respectively in the world of microscope systems (fig 11). The goal of diffused lighting is to illuminate the sample equally from all directions, coaxial along the axis of the camera only. Deep access prevents the lower angles of diffused lighting but does not affect coaxial.
Diffused Intensity reduces radially in all directions and so is affected by both its vertical and horizontal position from the source.

The illustrations in Fig 11 demonstrate the limitations of a diffused light source to illuminate a sample equally from all directions. Light intensity decreases from the center of its illumination and deep access restricts illumination from the lower angles. The ideal source would be very large (wider in the horizontal axis of this paper in the illustration but also normal to it in the 3 dimensional real world) and very close to the sample. In practice, its size is limited by other requirements important to the bond tester design and its height by the sample itself. In order to obtain illumination from the lowest angles possible, the diffused light source should be adjustable enabling it to be positioned as close to the sample as is possible depending on the deep access requirement (Fig 11b). Low angles of diffused illumination are required for the optimum contrast of rounded features.
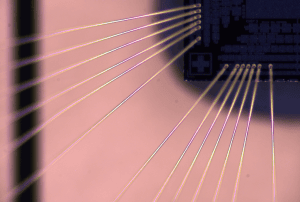
The advantages of these two types of illumination are evident in the examples of the same sample, one taken with diffused lighting (Fig 12), the other coaxial (Fig 13).
Diffused lighting, coming from many directions, highlights by direct reflection rounded objects like the wires in Fig 12. Coaxial, being on axis, highlights again by direct reflection, surfaces normal to the axis of the camera system. In both cases the highlighting effect is most pronounced when the surfaces are reflective. It should be possible to combine both types of illumination with independently variable intensities. The different illumination properties can then be selected or mixed to assist image analysis by increasing the contrast between the feature of interest and the other areas of the sample.
Measurement of gross sample position and variations in bond positions
Fiducial camera alignment
Similar to load/unload, referencing of the sample position has been solved for production line equipment but there is the previously mentioned issue where bonds or wires may obscure references used by other equipment that are no longer available. The advances described in the previous section on illumination generally enable some feature to be used as a reference/fiducial and this together with what is readily available within the industry make this possible in almost every case.
Accurate automatic alignment for variations in bond position
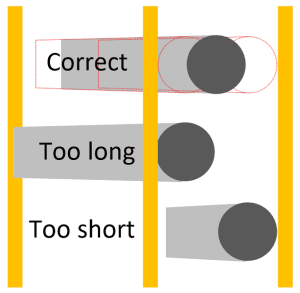
With a state of the art camera, including illumination and image analysis, many variations in bond position can be corrected for automatically. The design of the tool testing the bond is also directly related to alignment. Alignment is the starting point whereby the test method brings the tool into contact with the bond. Optimum alignment cannot be considered without considering the tool and the sample’s geometry. The sample’s geometry is typically fixed so the tool shape must be engineered correctly. Two examples on how tool design can assist alignment are hook foot length (Fig 14) and self-aligning shear tools (Fig 15).
In some cases the bond cannot be tested without some sample preparation, in which case the design of the prepared sample must be considered. Again in some cases this sample preparation can be done on the bond tester as part of the automation, for example, pushing wires that obscure a fiducial reference of the bond to be tested out of the way.
The ability to highlight normal and flat surfaces makes coaxial light often suitable for fiducial marks (Fig 16). Whereas diffused light can assist with the analysis of wires and ball type features (Fig 17).
Automatic failure mode analysis
Auto grading
With the ability to differentiate between different features the two type of illumination are equally useful for either manual or automatic failure mode analysis. Example of the same sample taken with the two different types of illumination are shown in Fig 18 of a 250µm solder ball and Fig 19 of 50µm pitch Gold ball shear.
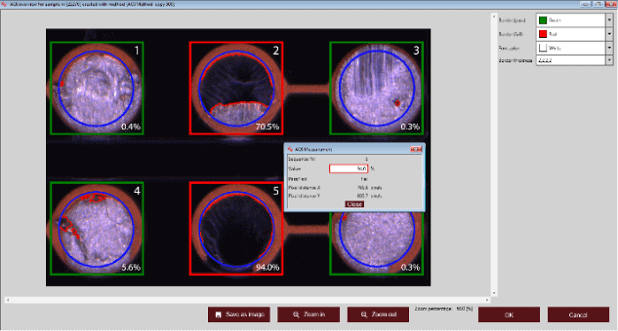
The capability of automatic grading has limitations but continuous development increases this capability every year. Where current technology limits what can be done automatically, operator intervention needs to be applied but in a manner that least affects what would otherwise be a fully automatic system. The example automatic analysis of the 250µm solder balls (Fig 20) shows a dialogue box with 6 failure modes. In practice the failure modes of tests can be tiled in a programmable matrix size (Fig 21).

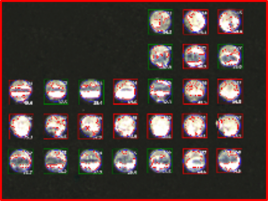
At the end of a fully automatic run, the bond tests system can display a screen, or screens, of failure modes for an operator to make a quick assessment. In many cases there is a significant similarity in the failure mode types, so together with the automated analysis, the operator can quickly accept or edit what is automatically presented. This manual assessment can be done live on the system or remotely and at any time. In this way, one operator can run several systems.
Test debris management
Examples of test debris are a loose die or shards of silicon after a die shear and solder balls after a ball shear. Debris can be projected at considerable velocity by the energy released when the bond fails, alternatively it may stick to the test tool or sample being tested. In some cases this is not an issue but in others it may be desirable or essential to control and capture such debris. This is a consideration for both manual and automatic testing but can be more significant in automation where more debris is likely to be produced and if not captured may contaminate the sample effecting bonds yet to be tested.
In most applications it is possible to capture debris with a combination of a timed delivery from a focused high pressure jet of gas (typically air) to the test, and propelling debris in the direction of a relatively larger low pressure but high flow vacuum pick up (Fig 22). Debris that is stuck to the sample or tool typically being dislodged by the pressure jet.
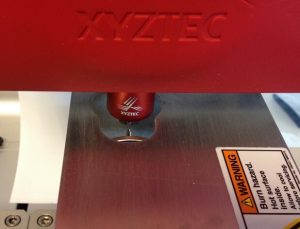
An extreme case occurs with Cold Ball Pull (CBP) where special tweezers grip and pull a solder balls. Over time the tweezers becoming contaminated with compacted solder. A solution is to use a heated gas jet that melts and then blows the solder clear (Fig 23). In extreme cases like this the cleaning process may be insufficiently robust to continue testing and so some operator involvement may need to be programed in, but even this can be mitigated using an automated camera inspection of the tool.
Non-Destruct Testing
Full automation is beneficial to all bond testing but it truly benefits Non-Destruct Testing (NDT). By its very nature, NDT requires the testing of many bonds. It is critical to account for every bond and to make sure a fatigued operator does not adversely affect a good bond during manual test. Fully automatic testing is by far the best way to achieve this. Automatic grading, in some cases the only obstacle to fully automatic testing, does not apply
Conclusion
Apart from fully automatic grading and the occasional debris contamination issue, it has been demonstrated that all the other requirements for full automatic bond testing can be directly achieved. When grading or debris contamination requires some human intervention, this can be implemented with little additional input.
By maintain yield and ensuring best quality, bond testing has always been an essential part of the manufacturing process. Current technology makes fully automatic testing viable, maintaining the advantages it brings but at much lower operating costs.


